One of the top causes of cosmetic rejects in molded parts is bubbles. This troublesome part defect not only results in appearance problems but impairs physical properties as well. Bubbles are a common occurrence and are often difficult to resolve.
In troubleshooting bubbles, many molders make the mistake of guessing at what the bubbles are, and then immediately start adjusting process parameters to eliminate them. I urge you to resist the temptation to start tweaking, and start by defining what the bubbles actually are.
There are only two possibilities:
1. Trapped gas, which includes air, moisture vapor, volatiles from the resin, or decomposition gases from the polymer or additives.
2. Vacuum void.
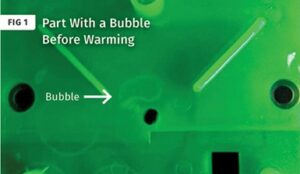
It is important to determine which type of bubble your part has, and what the root cause might be. Determining bubble type will allow you to pinpoint the source and determine your next course of action to eliminate the problem. How do you test to determine if it is gas or a vacuum void? Many claim (as I once did) that you can tell by the shape, location, or some other characteristic of the bubble or bubbles. But you can be fooled easily by this approach. There is a simple test you should use instead. It takes less than 15 minutes but requires a little patience to conduct.
It’s important to determine which type of bubble your part has, and what the root cause might be.
Test your part by gently warming the part area containing the bubble or bubbles until it softens. I emphasize gently because of the tendency of some operators to pick up the nearest torch and aim it at the part. Plastics do not quickly transfer heat through the nominal wall, so our friend with the torch will likely set the part on fire.
Instead, use a heat gun or something similar. Then as you gently warm the area of the part where the bubble is, the bubble should change form. If it is a gas bubble, the gas will warm up and expand, raising the surface, and often will pop as the part surface softens. If there is no air in the bubble and it’s a vacuum void instead, the bubble will collapse due to the atmospheric pressure pushing on the softened surface of the part. Now you know more of what the problem is.
There are some conditions required for this test to work. Ideally, find a bubble at least 3 mm (about 0.125 in.) or larger in diameter and make sure the part is no more than 4 hr old. It is possible for the bubble to start out as a void, but over time air migrates through the plastic and the void becomes a gas bubble. That is perhaps hard to believe, but during my last public seminar the class and I were treated to some striking evidence.