Injection molding is a popular manufacturing method for many reasons. It has proven especially valuable to those in the consumer product development sector, since plastics are a primary component of many consumer products, and injection molding is one of the best ways to manufacture plastics. Let’s take a quick look at the three major phases of the injection molding process, and then discuss the advantages and disadvantages of the process.
Design is one of the most important facets of the production process because it’s the earliest opportunity to prevent expensive mistakes later on. (Of course, determining whether you have a good idea in the first place is also important, but more on that here.) There are many objectives to design for: function, aesthetics, manufacturability, assembly, etc. The right design is one that accomplishes the required objectives to a satisfactory level, but it may take a lot of creativity to get there. Product design is most often accomplished with computer aided design (CAD) software, like SolidWorks. (Click here for nine pro tips on how to best use SolidWorks in design and engineering.) Proficiency with CAD software is vital because it allows for quicker iterations and more accurate prototyping if necessary.

Some specific ways to avoid costly mistakes during the product design process are to plan for uniform wall thickness whenever possible, and to gradually transition from one thickness to another when changes in thickness are not avoidable. It is also important to avoid building stress into the design, such as corners that are 90 degrees or less. (Read more about Injection Molding Defects here.)
A skilled team of design engineers will be able to brainstorm, design, and improve upon a variety of solutions to meet the particular complexities of a specific project. The design team at Creative Mechanisms has combined decades of experience creating elegant solutions to complex problems.
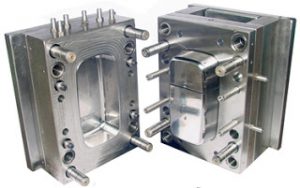
After a looks-like, feels-like design has been tested and slated for further production, the mold (or die) needs to be designed for injection mold manufacturing. Molds are commonly made from these types of metals:
Just as with overall product design, mold design is another opportunity to prevent defects during the injection molding process. We have previously written blogs on the Top 10 Injection Molding Defects and Avoiding Mistakes in Injection Molding, but here are some examples of how poor mold design can be a costly mistake:
The number of parts (cycles) required, as well as the material they will be made of will help drive decision-making as to how and with what materials to create the mold.
When a product has been properly designed, approved, and die cast, it’s time to start the actual manufacturing! Here are the basics of the injection molding process…
Thermoset or thermoplastic material in granular form is fed through a hopper into a heating barrel. (Learn more about the differences between plastics in our PLASTICS course.) The plastic is heated to a predetermined temperature and driven by a large screw through the gate(s) and into the mold. Once the mold is filled, the screw will remain in place to apply appropriate pressure for the duration of a predetermined cooling time. Upon reaching this point, the screw is withdrawn, the mold opened, and the part ejected. Gates will either shear off automatically or be manually removed. This cycle will repeat over and over, and can be used to create hundreds of thousands of parts in a relatively short amount of time.

photo courtesy of substech.com
| Terms and Conditions of Purchase Terms and Conditions of Sale | Privacy Policy CA Privacy Notice | Copyright © 2024 CEW. All Rights Reserved. |